This blog explains my 3-level Peppa Pig laser boss-fight game, including OOP inheritance, data types, control structures, localStorage, multiplayer mode, collision detection, and API-powered music.
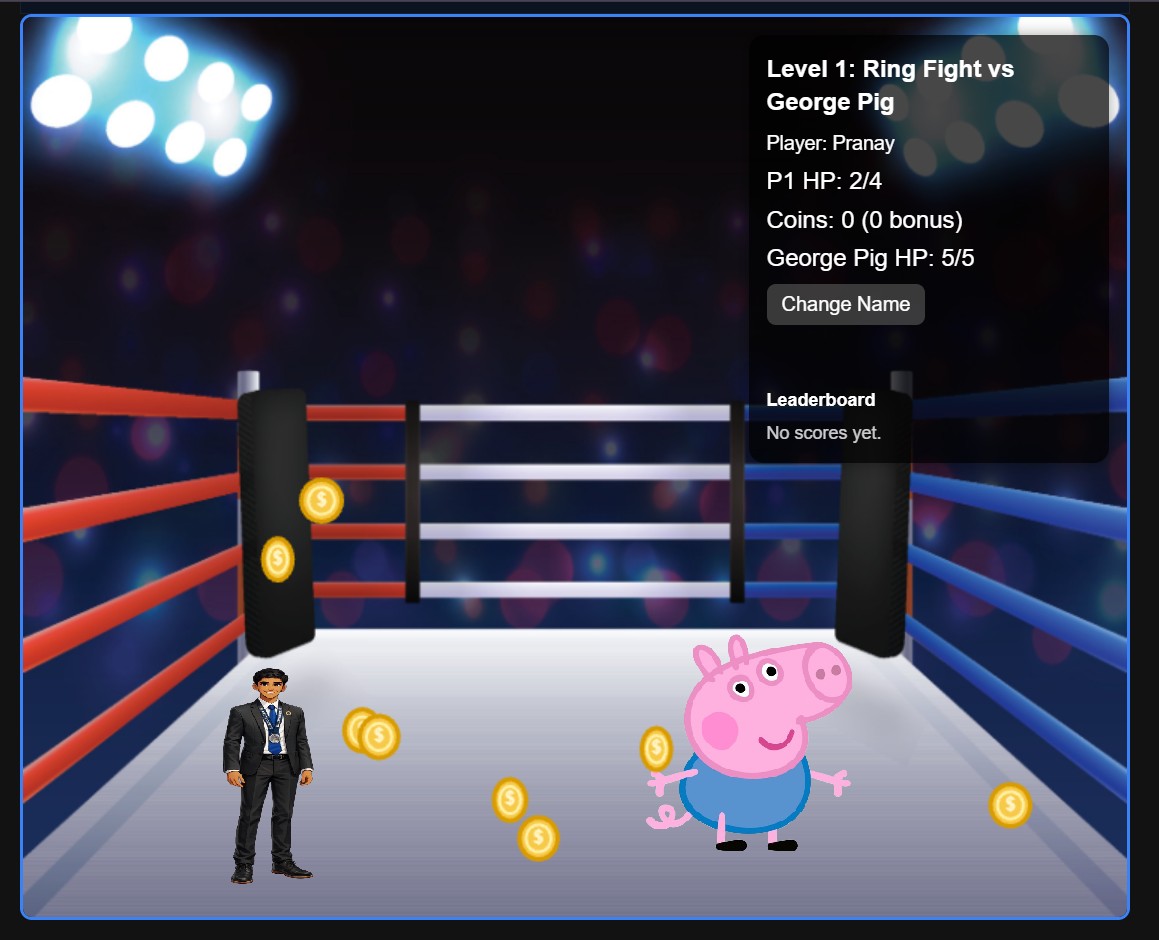
Overview
This project is a JavaScript-based boss battle game where the player controls Ishan Jha and fights Peppa Pig characters in different levels. The code handles movement, attacks, lasers, health, collision detection, HUD updates, win and lose screens, localStorage, character selection, multiplayer mode, and a leaderboard system.
The game is organized around a level class called PeppaBattleLevelBase, which manages the main gameplay systems for each fight. This makes the project more advanced than a simple one-screen game because it keeps track of many systems at the same time, such as player health, enemy health, attack cooldowns, API calls, and visual updates.
A strong example of this is in the constructor, where the game sets up values like player health, attack cooldown, enemy laser timing, the player name, score tracking, and leaderboard data all in one place.
class PeppaBattleLevelBase {
    constructor(gameEnv, config) {
        this.gameEnv = gameEnv;
        this.config = config;

        this.playerMaxHealth = config.playerHealth ?? 5;
        this.playerHealth = this.playerMaxHealth;
        this.playerDamageCooldownMs = config.playerDamageCooldownMs ?? 650;
        this.attackCooldownMs = config.attackCooldownMs ?? 450;
        this.laserSpeed = config.laserSpeed ?? 14;

        this.apiBase = config.apiBase || null;
        this.playerName = config.playerName || 'Ishan';
        this.levelScore = 0;
        this.leaderboard = [];
    }
}
This code shows how the game stores important information at the start of the level. If no custom player health is provided, the game automatically uses 5. If no player name is given, it defaults to "Ishan". This makes the code more flexible and reusable.
Object-Oriented Programming (OOP)
How the Level Class Organizes the Fight
This project uses object-oriented programming because the game is built around classes and methods. The PeppaBattleLevelBase class is responsible for controlling one level of the game. Instead of putting all code in one giant script, the game groups related behavior into methods like initialize(), destroy(), update(), and createHud().
class PeppaBattleLevelBase {
    constructor(gameEnv, config) {
        this.gameEnv = gameEnv;
        this.config = config;
        this.playerHealth = this.playerMaxHealth;
        this.levelScore = 0;
        this.leaderboard = [];
    }

    initialize() {
        this.createHud();
        this.updateHud(
            `${this.config.enemyName}: "${this.config.enemyGreeting}" — Fight!`
        );
    }

    destroy() {
        document.removeEventListener('keydown', this.boundKeyDown);
        if (this.hud) {
            this.hud.remove();
        }
    }
}
A specific example is the initialize() method, which starts the HUD and shows a message telling the player how to fight. Another example is destroy(), which removes event listeners and HUD elements so old level data does not stay on the screen.
This is useful because each level can reuse the same class structure while changing values in config, such as the enemy name, enemy health, level title, and intro message.
Custom Boss Enemy Class
The PeppaBossEnemy class is one of the clearest examples of object-oriented programming in the project. It extends the engine's Enemy class, so it inherits basic sprite drawing, position, and canvas behavior, then adds custom boss-specific state like health, maxHealth, moveSpeed, and isDefeated.
import Enemy from '@assets/js/GameEnginev1.1/essentials/Enemy.js';

class PeppaBossEnemy extends Enemy {
    constructor(data = null, gameEnv = null) {
        super(data, gameEnv);
        this.health = data?.health ?? 3;
        this.maxHealth = this.health;
        this.moveSpeed = data?.moveSpeed ?? 0.8;
        this.isDefeated = false;
    }

    update() {
        this.draw();
        if (this.isDefeated) return;

        const player = this.gameEnv.gameObjects.find(obj => obj?.constructor?.name === 'Player');
        if (!player) return;

        const myCenterX = this.position.x + this.width / 2;
        const myCenterY = this.position.y + this.height / 2;
        const playerCenterX = player.position.x + player.width / 2;
        const playerCenterY = player.position.y + player.height / 2;

        const dx = playerCenterX - myCenterX;
        const dy = playerCenterY - myCenterY;
        const distance = Math.hypot(dx, dy);

        if (distance > 1) {
            this.position.x += (dx / distance) * this.moveSpeed;
            this.position.y += (dy / distance) * this.moveSpeed;
        }

        this.stayWithinCanvas();
    }

    handleCollisionEvent() {
        // Collision handling is managed by the level logic.
    }

    takeDamage(amount = 1) {
        if (this.isDefeated) return true;

        this.health = Math.max(0, this.health - amount);
        if (this.health === 0) {
            this.isDefeated = true;
            this.canvas.style.filter = 'grayscale(1) brightness(0.8)';
            this.canvas.style.opacity = '0.6';
        }

        return this.isDefeated;
    }
}

export default PeppaBossEnemy;
The important OOP idea is constructor chaining. The line super(data, gameEnv) runs the parent Enemy constructor first, which lets the boss appear as a real game object. After that, my custom constructor adds the health system and movement speed. The update() method overrides the enemy behavior so the boss redraws every frame, finds the player, calculates the distance using Math.hypot(), and moves toward the player with normalized movement.
The takeDamage(amount) method gives the boss its battle logic. It subtracts health with Math.max(0, this.health - amount), marks the boss as defeated when health reaches zero, and visually changes the sprite with grayscale and opacity. Returning this.isDefeated is useful because the level logic can tell whether a laser hit finished the fight.
Power-Up Menu Class
The PeppaPowerUpMenu class adds another example of a custom class that is not a normal battle level. It creates a menu between levels where the player can choose Extra Speed, Extra Health, or Extra Damage. This shows arrays, DOM output, keyboard input, and game-state persistence through gameControl.chosenPower.
class PeppaPowerUpMenu {
    constructor(gameEnv) {
        this.gameEnv = gameEnv;
        this.selectedOption = 0;
        this.options = [
            { name: 'Extra Speed', description: 'Move faster in battle' },
            { name: 'Extra Health', description: 'Start with more health' },
            { name: 'Extra Damage', description: 'Deal more damage per laser' }
        ];
        this.chosenPower = null;
        this.classes = [];
    }

    initialize() {
        if (window.speechSynthesis) {
            window.speechSynthesis.speak = () => {};
            window.speechSynthesis.cancel();
        }
        this.createMenu();
        this.boundKeyDown = this.handleKeyDown.bind(this);
        document.addEventListener('keydown', this.boundKeyDown);
        this.gameEnv.gameControl.removeExitKeyListener();
    }

    destroy() {
        document.removeEventListener('keydown', this.boundKeyDown);
        const menu = document.getElementById('peppa-powerup-menu');
        if (menu) menu.remove();
        this.gameEnv.gameControl.addExitKeyListener();
    }

    selectPower() {
        this.chosenPower = this.options[this.selectedOption].name;
        this.gameEnv.gameControl.chosenPower = this.chosenPower;
        this.gameEnv.gameControl.currentLevel.continue = false;
    }

    update() {
        // No-op for compatibility with game loop
    }
}

export default PeppaPowerUpMenu;
The menu stores the choices in an array of objects called options. Each object has a name and description, which makes the menu easy to expand later. The selectedOption number tracks which power-up is currently highlighted, and selectPower() saves the final choice to this.gameEnv.gameControl.chosenPower so the next battle level can read it.
this.boundKeyDown. That matters because removeEventListener() only works correctly if it receives the exact same function reference that was passed to addEventListener().Methods & Functions
Setup Logic, Persistence, and Input Handling
The updated level code uses methods to keep each job separated. The initialize() method starts the level, loads saved data, creates coins, builds the HUD, creates the laser canvas, and loads the leaderboard. This keeps setup logic organized instead of mixing it into the game loop.
initialize() {
    if (window.speechSynthesis) {
        window.speechSynthesis.speak = () => {};
        window.speechSynthesis.cancel();
    }

    this.ensurePlayerName();
    this.generateCoins();
    this.createHud();

    if (this.gameMode === 'twoPlayer') {
        this.updateHud('2P Mode: Collect coins and defeat the boss!');
    } else {
        this.updateHud('Fight! Use WASD to move, SPACE to fire lasers, and collect coins.');
    }

    document.addEventListener('keydown', this.boundKeyDown);
    this.createLaserLayer();

    this.loadLeaderboard().then(() => {
        this.renderLeaderboard();
    });
}
The handleKeyDown(event) method also supports both players. Player 1 attacks with Space, and Player 2 attacks with Enter only when the game is in two-player mode.
handleKeyDown(event) {
    if (event.code === 'Space') {
        this.attackRequested = true;
        event.preventDefault();
    }

    if (this.gameMode === 'twoPlayer' && event.code === 'Enter') {
        this.player2AttackRequested = true;
        event.preventDefault();
    }
}
This is a good example of methods working together: input methods set request flags, the update loop reads those flags, and separate spawn methods create the lasers.
Return Values in Battle Methods
The boss and menu code also show methods with useful return values and state changes. takeDamage(amount) returns a boolean, so the level can know if the boss has been defeated after a hit. selectPower() does not return a value, but it changes shared game state by saving the chosen power-up to gameControl.chosenPower and then moving the game to the next level.
takeDamage(amount = 1) {
    if (this.isDefeated) return true;

    this.health = Math.max(0, this.health - amount);
    if (this.health === 0) {
        this.isDefeated = true;
        this.canvas.style.filter = 'grayscale(1) brightness(0.8)';
        this.canvas.style.opacity = '0.6';
    }

    return this.isDefeated;
}
This method connects directly to the gameplay because every player laser hit eventually calls boss.takeDamage(). The method handles the boss's health, defeat state, visual defeat effect, and return value in one organized place.
Specific Code Definitions
This section makes the blog stronger because it does not only say that the game uses arrays, numbers, booleans, and objects. It explains the exact variables that are defined in my code, what each one stores, and why each one matters during gameplay.
Important Variables Defined in the Battle Level
Most of the important game state is defined inside the constructor of PeppaBattleLevelBase.
These definitions are important because the constructor runs once when the level starts, so it sets the
starting rules for health, lasers, coins, multiplayer mode, cooldowns, score, and the leaderboard.
this.gameMode = config.gameMode ?? localStorage.getItem('peppaGameMode') ?? 'singlePlayer';

    this.playerMaxHealth = config.playerHealth ?? 5;
    this.playerHealth = this.playerMaxHealth;
    this.player2MaxHealth = config.playerHealth ?? 5;
    this.player2Health = this.player2MaxHealth;

    this.attackCooldownMs = config.attackCooldownMs ?? 450;
    this.lastAttackAt = 0;
    this.lastPlayer2AttackAt = 0;
    this.enemyLaserIntervalMs = config.enemyLaserIntervalMs ?? 1100;

    this.lasers = [];
    this.coins = [];
    this.coinCount = 0;
    this.coinValue = config.coinValue ?? 25;
    this.leaderboard = [];
this.battleEnded = false;| Definition | Type | What It Controls | Why It Matters |
|---|---|---|---|
this.gameMode |
String | Stores whether the game is in singlePlayer or twoPlayer mode. |
This controls whether the level creates only Player 1 and the boss, or creates both Player 1 and Player 2 for multiplayer. |
this.playerHealth and this.player2Health |
Number | Stores the current HP for Player 1 and Player 2. | These values decide when a player loses. When health reaches 0, the lose screen or multiplayer winner message is triggered. |
this.attackCooldownMs |
Number | Stores the required delay between laser attacks. | This prevents the player from holding the attack key and firing unlimited lasers every frame. |
this.lastAttackAt and this.lastPlayer2AttackAt |
Number | Stores the timestamp of the last attack for each player. | The code compares Date.now() to these timestamps to decide whether the cooldown has passed. |
this.enemyLaserIntervalMs |
Number | Controls how often the boss fires a laser. | Lower values make the boss attack faster, which makes the level harder without changing the rest of the code. |
this.lasers |
Array | Stores every active laser projectile currently moving across the screen. | Each laser is pushed into this array when fired, updated every frame, and removed when it expires or hits something. |
this.coins |
Array | Stores every coin object placed in the level. | The game loops through this array to draw coins and check whether the player collected one. |
this.coinCount and this.coinValue |
Number | Tracks how many coins were collected and how much each coin is worth. | These values are used in the final score calculation: health points plus coin bonus. |
this.leaderboard |
Array | Stores score entries loaded from an API or from localStorage. | This lets the HUD display top scores without hard-coding them into the page. |
this.battleEnded |
Boolean | Stores whether the current fight is already over. | This stops the update loop from continuing after a win or loss, preventing extra lasers, damage, or repeated transitions. |
How this.lasers Actually Works
The this.lasers array is one of the most important definitions in the project.
It starts empty, but every time a player or boss fires, a new laser object is added with its position,
velocity, owner, and lifetime.
this.lasers.push({
      x: fromX,
      y: fromY,
      vx: (dx / len) * this.laserSpeed,
      vy: (dy / len) * this.laserSpeed,
      isPlayerLaser,
      source: sourceId,
      life: 60,
      maxLife: 60
    });
Each laser object stores everything the game needs to move and draw the laser. x and
y are the current position. vx and vy are the movement speed in
the x and y directions. source tells the game who fired it, such as player1,
player2, or boss. life counts down every frame so old lasers
disappear instead of staying forever.
Specific Variables in the Boss Enemy Class
The PeppaBossEnemy constructor defines boss-specific state. These variables make the boss
different from a normal engine enemy because the boss can chase the player, take damage, and become defeated.
this.health = data?.health ?? 3;
    this.maxHealth = this.health;
    this.moveSpeed = data?.moveSpeed ?? 0.8;
this.isDefeated = false;| Boss Variable | What It Does |
|---|---|
this.health |
Stores how many hits the boss can still take before losing. |
this.maxHealth |
Stores the original health value so the HUD can show health as current HP out of max HP. |
this.moveSpeed |
Controls how many pixels the boss moves toward the player each frame. |
this.isDefeated |
Acts as a boolean state flag. When it becomes true, the boss stops moving and the level can transition to the next stage. |
Specific Variables in the Power-Up Menu
The power-up menu also has important definitions. This class does not control lasers directly, but it controls the player's choice before the next battle.
this.selectedOption = 0;
    this.options = [
      { name: 'Extra Speed', description: 'Move faster in battle' },
      { name: 'Extra Health', description: 'Start with more health' },
      { name: 'Extra Damage', description: 'Deal more damage per laser' }
    ];
    this.chosenPower = null;
this.selectedOption stores which menu option is currently highlighted.
this.options is an array of objects, where each object has a name and
description. this.chosenPower starts as null because the player
has not picked anything yet. After pressing Enter, the selected power-up is stored in
this.gameEnv.gameControl.chosenPower so the game can remember the choice across levels.
Data Types
this.gameMode = config.gameMode ?? localStorage.getItem('peppaGameMode') ?? 'singlePlayer'; // String
this.playerMaxHealth = config.playerHealth ?? 5;      // Number
this.player2Health = this.player2MaxHealth;          // Number
this.attackRequested = false;                      // Boolean
this.player2AttackRequested = false;               // Boolean
this.lasers = [];                                     // Array
this.coins = [];                                      // Array
this.playerSpawn = { x: width * 0.12, y: height * 0.72 }; // Object
The updated game uses many JavaScript data types. Strings store the game mode and player names, numbers store health and score values, booleans track whether attacks were requested, arrays store lasers and coins, and objects store spawn positions and sprite data.
A strong example is this.gameMode. It can be 'singlePlayer' or 'twoPlayer', and the rest of the code changes behavior based on that string.
Operators
this.playerHealth = Math.max(0, this.playerHealth - 1);
this.player2Health = Math.max(0, this.player2Health - 1);
L.x += L.vx;
L.y += L.vy;
L.life -= 1;
const score = (this.playerHealth * 100) + (this.coinCount * this.coinValue);
const distance = Math.hypot(playerCenterX - coin.x, playerCenterY - coin.y);
Operators are used constantly to make the game function. Subtraction lowers player health, addition updates laser position, and multiplication calculates the final score.
The improved score formula rewards both survival and coin collection: remaining health is worth 100 points each, and each coin adds a bonus based on coinValue.
Control Structures
Control structures decide which version of the game runs. The code checks whether the game is in single-player or two-player mode, whether a player has attacked, whether someone has lost, and whether the boss has been defeated.
if (this.gameMode === 'twoPlayer') {
    if (!player || !player2) return;
} else {
    if (!player || !boss) return;
}
This conditional prevents the game loop from running until the correct objects exist. In two-player mode, the game waits for both players. In single-player mode, it waits for the player and the boss.
const player1Dead = this.playerHealth <= 0;
const player2Dead = player2 && this.player2Health <= 0;

if ((player1Dead || player2Dead) && !this.battleEnded) {
    this.battleEnded = true;
    let lossMessage = 'You lost. Restarting level...';

    if (this.gameMode === 'twoPlayer') {
        if (player1Dead && player2Dead) lossMessage = 'Draw! Both players defeated! Restarting...';
        else if (player1Dead) lossMessage = 'Player 2 Wins! Player 1 defeated. Restarting...';
        else lossMessage = 'Player 1 Wins! Player 2 defeated. Restarting...';
    }
}
This makes the ending more advanced because the game can show different messages depending on which player loses in two-player mode.
Menu Control with Arrow Keys and Enter
The power-up menu uses conditionals to control navigation. Pressing the up arrow moves the selected option backward, pressing the down arrow moves it forward, and pressing Enter confirms the current power-up. The modulo operator keeps the selection inside the array, so moving above the first option wraps around to the last option.
handleKeyDown(event) {
    if (event.key === 'ArrowUp') {
        this.selectedOption = (this.selectedOption - 1 + this.options.length) % this.options.length;
        this.renderOptions();
    } else if (event.key === 'ArrowDown') {
        this.selectedOption = (this.selectedOption + 1) % this.options.length;
        this.renderOptions();
    } else if (event.key === 'Enter') {
        this.selectPower();
    } else if (event.key === 'Escape') {
        event.preventDefault();
    }
    event.preventDefault();
}
This is a strong control-structure example because one method handles multiple possible inputs and updates the screen differently depending on which key was pressed.
Arrays and Collections
Arrays are used to store multiple game objects, lasers, coins, and leaderboard entries. This lets the game update many items every frame without needing separate variables for each one.
this.classes = [
    { class: GameEnvBackground, data: image_data_background },
    { class: Player, data: sprite_data_ishan }
];

if (this.gameMode === 'twoPlayer') {
    this.classes.push({ class: Player, data: sprite_data_player2 });
} else {
    this.classes.push({ class: PeppaBossEnemy, data: sprite_data_enemy });
}
This is important because the game builds a different class list depending on the selected mode. Two-player mode adds a second player, while single-player mode adds the boss enemy.
this.lasers.push({
    x: fromX,
    y: fromY,
    vx,
    vy,
    isPlayerLaser,
    source: sourceId,
    life: 60,
    maxLife: 60
});
The source property makes the laser system more flexible. A laser can come from player1, player2, or the boss, so the collision system knows who should be damaged.
Game Loop and Real-Time Updates
Why the Update Method Matters
The update() method is the main real-time loop for the battle. It checks player objects, handles attacks, moves lasers, enforces boundaries, checks win/loss conditions, and updates the HUD every frame.
if (this.attackRequested) {
    this.attackRequested = false;
    if (now - this.lastAttackAt >= this.attackCooldownMs) {
        this.lastAttackAt = now;
        const px = player.position.x + player.width / 2;
        const py = player.position.y + player.height / 2;
        const dir = player.direction || 'right';
        this.spawnLaserStraight(px, py, dir, true, 'player1');
    }
}
This code uses attack request flags and cooldown timing so attacks happen in the update loop and cannot be spammed too quickly.
if (boss && !boss.isDefeated && now - this.lastEnemyLaserAt >= this.enemyLaserIntervalMs) {
    this.lastEnemyLaserAt = now;
    const closestPlayer = this.getClosestPlayer(boss);
    if (closestPlayer) {
        this.spawnLaser(bx, by, px, py, false, 'boss');
    }
}
The boss can target the closest player by comparing center distances. That makes the enemy behavior more dynamic than always shooting at one fixed player.
API Integration
Using a Live Web API for Game Music
The API part of my Peppa Pig Fighting Game uses the iTunes Search API to request real music data from the internet. Instead of hard-coding one song into the game, the code searches for music related to Peppa Pig, receives JSON data, finds a playable preview URL, and uses that preview as background music in the game.
This follows the same Web API flow used in class:
- Use
fetch()to request data from a web server. - Check the HTTP response status before using the data.
- Convert the response into JSON with
response.json(). - Extract useful fields like
trackName,artistName, andpreviewUrl. - Use the result in gameplay by playing the preview with the browser Audio API.
Connection to the Game
The game's PeppaMusic class uses this exact same pattern. It calls the iTunes API, waits for
response.json(), extracts a playable previewUrl, and plays the audio during gameplay.
The demo below uses the same API flow, but searches for Rick Astley's Never Gonna Give You Up
instead of a Peppa Pig song.
🎵 Live Demo — Rickroll with the iTunes API
Click the button to make a real iTunes API call, find Never Gonna Give You Up, extract the
song's previewUrl, and play the 30-second preview in your browser.
Rickroll iTunes API Code
async playRickrollPreview() {
  const searchTerm = 'Rick Astley Never Gonna Give You Up';
  const url = 'https://itunes.apple.com/search?entity=song&limit=5&term=' +
    encodeURIComponent(searchTerm);

  const response = await fetch(url);

  if (!response.ok) {
    throw new Error('iTunes API request failed: ' + response.status);
  }

  const data = await response.json();
  const track = data.results.find(song =>
    song.previewUrl &&
    song.trackName.toLowerCase().includes('never gonna give you up')
  );

  const audio = new Audio(track.previewUrl);
  audio.volume = 0.35;
  await audio.play();
}
Building the API Request URL
const filter = "peppa pig theme";
const url = "https://itunes.apple.com/search?term=" + encodeURIComponent(filter);

console.log(url);
The iTunes API needs a search term inside the URL. I use encodeURIComponent() because spaces and special characters need to be converted into a safe URL format. For example, "peppa pig theme" becomes "peppa%20pig%20theme".
Fetching and Checking the API Response
const url = "https://itunes.apple.com/search?term=" + encodeURIComponent("peppa pig theme");

fetch(url, { method: 'GET', mode: 'cors' })
  .then(response => {
    if (response.status !== 200) {
      throw new Error('Database response error: ' + response.status);
    }
    return response.json();
  })
  .then(data => {
    console.log('Track count:', data.results.length);
  })
  .catch(err => console.error(err));
This code sends a GET request to the iTunes Search API. The most important part is checking the status code before using the response. If the response is not successful, the code throws an error instead of trying to use broken data.
Reading JSON Data from the API
const data = {
  results: [
    {
      artistName: 'The Wiggles',
      trackName: 'Peppa Pig Theme',
      artworkUrl100: 'https://example.com/image.jpg',
      previewUrl: 'https://example.com/preview.mp4'
    }
  ]
};

for (const row of data.results) {
  const artist = row.artistName;
  const track = row.trackName;
  const imageUrl = row.artworkUrl100;
  const previewUrl = row.previewUrl;

  console.log(artist, track, imageUrl, previewUrl);
}
JSON is the format returned by the API. After the response is parsed, the data can be used like a normal JavaScript object. In this project, the most important value is previewUrl, because that is the audio preview the game can play.
Playing API Music with the Audio API
const previewUrl = 'https://example.com/song.mp4';
const audio = new Audio(previewUrl);

audio.volume = 0.35;
audio.loop = true;

audio.play().catch(err => {
  console.warn('Autoplay blocked until user gesture:', err);
});
The Audio API lets the browser create and control sound. The game creates a new Audio object from the API preview URL, lowers the volume, loops the track, and tries to play it. The catch() block is important because some browsers block audio until the player clicks or presses a key.
Controller Class for Cleaner API Code
class PeppaMusicApiController {
  constructor(endpoint) {
    this.endpoint = endpoint;
  }

  async fetchPreviewUrl() {
    const response = await fetch(this.endpoint);

    if (!response.ok) {
      throw new Error('API request failed (' + response.status + ')');
    }

    const data = await response.json();
    const tracks = data && Array.isArray(data.results) ? data.results : [];
    const track = tracks.find(item => item && item.previewUrl);

    if (!track) {
      throw new Error('No playable preview URL found');
    }

    return track.previewUrl;
  }

  async startMusic() {
    const previewUrl = await this.fetchPreviewUrl();
    const audio = new Audio(previewUrl);

    audio.volume = 0.35;
    audio.loop = true;

    await audio.play();
  }
}

console.log('PeppaMusicApiController loaded');
This class separates the API logic from the rest of the game. The fetchPreviewUrl() method handles the web request and JSON parsing, while startMusic() handles the audio playback. This makes the project cleaner because the game does not need to repeat API code every time it wants to play music.
Error Handling
async startMusicSafely(controller) {
  try {
    const previewUrl = await controller.fetchPreviewUrl();
    const audio = new Audio(previewUrl);

    audio.volume = 0.35;
    audio.loop = true;

    await audio.play();
    console.log('Music started successfully');
  } catch (error) {
    console.warn('Failed to play music:', error);
  }
}
Error handling is important because APIs can fail, internet connections can break, or the browser can block autoplay. With try/catch, the game can continue running even if the music does not play.
Multiplayer Mode
2-Player Mode with Separate Controls
The updated code supports both singlePlayer and twoPlayer mode. The mode can come from the level config, from localStorage, or default to single-player if nothing was saved.
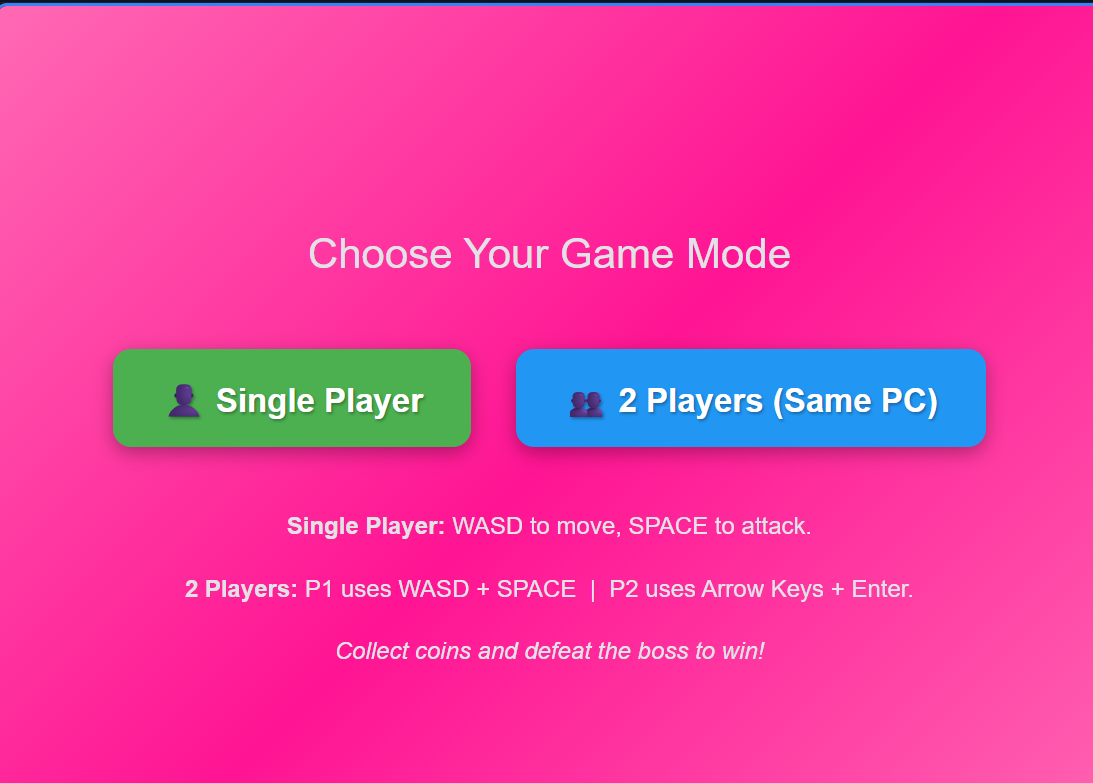
Player 1 uses WASD to move and Space to fire a cyan laser.
Player 2 uses the arrow keys to move and Enter to fire a green laser.
this.gameMode = config.gameMode ?? localStorage.getItem('peppaGameMode') ?? 'singlePlayer';
The level also creates different game objects depending on the mode. In twoPlayer mode, it adds Player 2. In single-player mode, it adds the boss enemy.
if (this.gameMode === 'twoPlayer') {
    this.classes.push({ class: Player, data: sprite_data_player2 });
} else {
    this.classes.push({ class: PeppaBossEnemy, data: sprite_data_enemy });
}
The HUD changes too. In two-player mode, it becomes wider, shows Player 2 health, and displays both control schemes.
Character Selection
Saving Player Character Choices
The game also supports character swapping. Before the battle starts, players can choose character images and names. Those choices are saved so the battle level can load the correct player sprites.
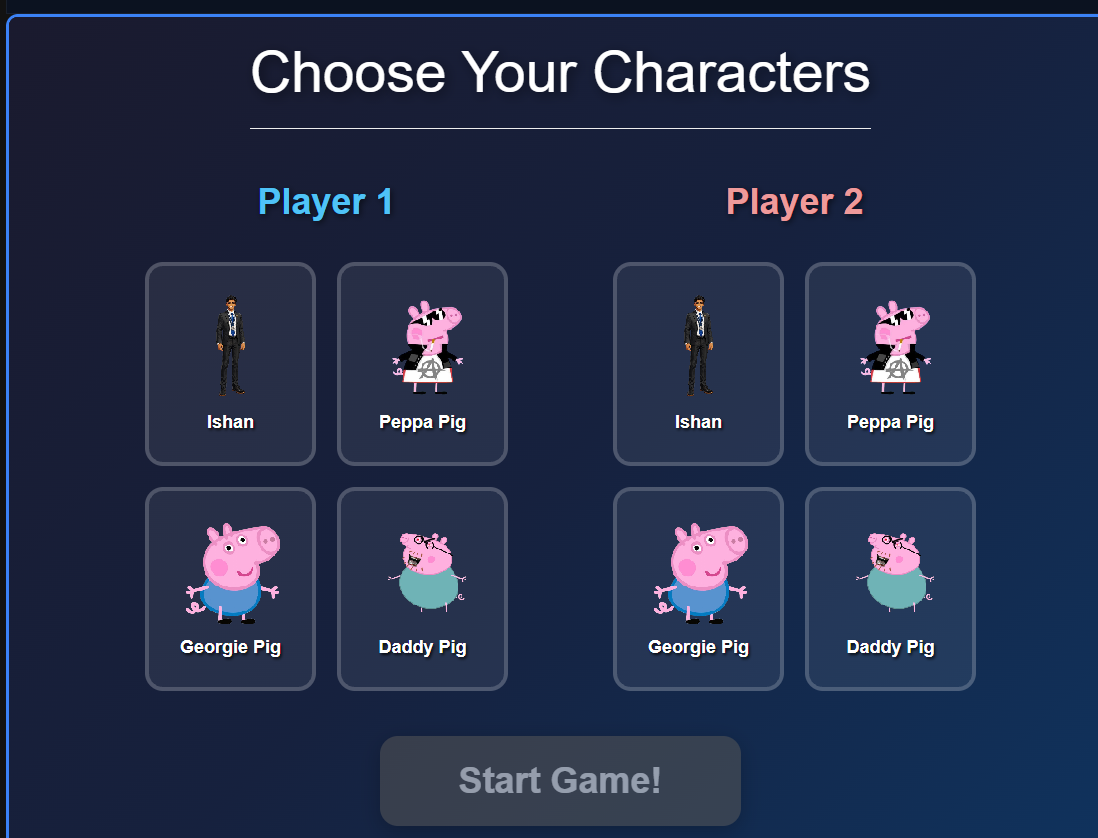
// Read character selections saved by the welcome/character-select screen
const p1CharImage = localStorage.getItem('peppaPlayer1CharImage') || 'ishan-jha.png';
const p1CharName  = localStorage.getItem('peppaPlayer1CharName')  || 'Ishan';
const p2CharImage = localStorage.getItem('peppaPlayer2CharImage') || 'ishan-jha.png';
const p2CharName  = localStorage.getItem('peppaPlayer2CharName')  || 'Player 2';

const p1Image = this.gameMode === 'twoPlayer' ? p1CharImage : 'ishan-jha.png';
const p1Name  = this.gameMode === 'twoPlayer' ? p1CharName  : 'Ishan';
This code checks saved character data. If no character was saved, the game uses safe default values like ishan-jha.png and Ishan.
selectCharacter(char, playerNum, accentColor) {
    const charData = {
        image: char.image,
        name: char.name,
        accentColor: accentColor
    };

    if (playerNum === 1) {
        this.p1Character = charData;
        localStorage.setItem('peppaPlayer1CharImage', char.image);
        localStorage.setItem('peppaPlayer1CharName', char.name);
    } else {
        this.p2Character = charData;
        localStorage.setItem('peppaPlayer2CharImage', char.image);
        localStorage.setItem('peppaPlayer2CharName', char.name);
    }

    this.updateStartButton();
}
This is a strong example of data persistence because the game stores each player's character name and image in the browser, then uses those values later during gameplay.
LocalStorage and Data Persistence
Remembering Game State in the Browser
localStorage is used so the game can remember player preferences and scores after the page reloads. This includes the selected game mode, player name, character choices, and local leaderboard scores.
ensurePlayerName() {
    if (this.playerName && this.playerName.trim()) return;

    const savedName = localStorage.getItem('peppaPlayerName');
    if (savedName && savedName.trim()) {
        this.playerName = savedName.trim();
        return;
    }

    let inputName = window.prompt('Enter your name for the leaderboard:', '');
    if (!inputName || !inputName.trim()) inputName = 'Player';

    this.playerName = inputName.trim().slice(0, 20);
    localStorage.setItem('peppaPlayerName', this.playerName);
}
This method first checks whether a player name already exists, then checks browser storage, then asks the player for a name only if needed. The name is limited to 20 characters before saving.
API Fallback to Local Leaderboard
The game can save scores to a backend API when apiBase exists. If no API is configured, it automatically saves the leaderboard locally instead.
async saveScore(score) {
    if (!this.apiBase) {
        this.saveScoreLocal(score);
        return { success: true };
    }

    const response = await fetch(`${this.apiBase}/leaderboard`, {
        method: 'POST',
        headers: { 'Content-Type': 'application/json' },
        body: JSON.stringify({
            name: this.playerName || 'Player',
            score: score,
            levelId: this.config.levelId,
            levelTitle: this.config.levelTitle
        })
    });
}
Local Leaderboard Storage
saveScoreLocal(score) {
    const leaderboardKey = `peppa-leaderboard-${this.config.levelId}`;
    const existing = this.loadLeaderboardLocal();

    existing.push({
        name: this.playerName || 'Player',
        score: score,
        timestamp: Date.now()
    });

    existing.sort((a, b) => (b.score ?? 0) - (a.score ?? 0));
    const topScores = existing.slice(0, 10);
    localStorage.setItem(leaderboardKey, JSON.stringify(topScores));
}
The leaderboard is stored separately for each level using a key like peppa-leaderboard-lvl1. The game sorts scores from highest to lowest and keeps the top 10.
Why this is important: The game still has persistent scores even without a live backend server, which makes the project more reliable for demos and GitHub Pages deployment.
Collision System
Laser Hitboxes and Damage
The collision system checks whether laser hitboxes overlap with players or the boss. The updated laser objects also store a source, so the game knows whether the laser came from Player 1, Player 2, or the boss.
if (this.gameMode === 'twoPlayer') {
    if (L.source === 'player1' && player2) {
        // Player 1 laser can hit Player 2
        this.player2Health = Math.max(0, this.player2Health - 1);
    } else if (L.source === 'player2' && player) {
        // Player 2 laser can hit Player 1
        this.playerHealth = Math.max(0, this.playerHealth - 1);
    }
}
In two-player mode, Player 1 and Player 2 can damage each other with lasers. The game uses cooldown timers like lastPlayerHitAt and lastPlayer2HitAt so damage does not happen too quickly.
Bounding Box Collision
areColliding(a, b) {
    if (!a || !b) return false;
    return (
        a.position.x < b.position.x + b.width &&
        a.position.x + a.width > b.position.x &&
        a.position.y < b.position.y + b.height &&
        a.position.y + a.height > b.position.y
    );
}
This method checks whether two rectangles overlap. It is used for physical collision checks like the player touching the boss in single-player mode.
Floor Barriers
if (player && player.height) {
    if (player.position.y < floorY) {
        player.position.y = floorY;
        player.velocity.y = 0;
    }
    if (player.position.y + player.height > height) {
        player.position.y = height - player.height;
        player.velocity.y = 0;
    }
}
The floor barrier logic keeps players and bosses inside the visible arena. This prevents characters from floating too high, falling out of bounds, or leaving the playable area.
Coins and Scoring
Coin Generation and Collection
The updated code adds collectible coins. Coins spawn randomly inside the playable arena, avoid spawning too close to the player or enemy, and increase the final score when collected.
this.coins = [];
this.coinCount = 0;
this.coinValue = config.coinValue ?? 25;
this.coinRadius = config.coinRadius ?? 14;
this.coinTotal = config.coinTotal ?? 8;
These values control how many coins appear, how large they are, and how many points each coin is worth.
if (distance <= collectRadius) {
    coin.collected = true;
    this.coinCount += 1;
    this.updateHud(`Coin collected! +${this.coinValue} score`);
}
When the player is close enough to a coin, the coin becomes collected, the coin count increases, and the HUD shows immediate feedback.
Final Score and Victory Screen
const score = (this.playerHealth * 100) + (this.coinCount * this.coinValue);
this.levelScore = score;

this.saveScore(score)
    .then(() => this.loadLeaderboard())
    .then(() => this.renderLeaderboard());
The final score combines remaining health with the coin bonus. After calculating it, the game saves the score, reloads the leaderboard, and re-renders the leaderboard on the HUD.
Improvement from the original version: The game now rewards exploration and survival instead of only counting boss defeat. Coins make the arena more interactive.
Code Runner Challenge
To make my blog more interactive, I added a Code Runner Challenge section inspired by the style of online coding sandboxes. Instead of only describing API logic, this lets the reader run a small async/await example directly in the page and see the output below the editor.
The challenge connects directly to my localStorage system because it mimics the same ideas used in my game: saving a player name, saving a game mode, storing leaderboard scores as JSON, and loading the data back into the page.
Code Runner Challenge
Experiment with localStorage and JSON handling. This mimics saving game settings and leaderboard data.
Output
This challenge demonstrates the same concepts as my game storage code: localStorage, JSON.stringify, JSON.parse, sorting scores, and error handling.
Why this belongs in my blog: My Peppa Pig Fighting Game saves game mode, character selections, player name, and leaderboard scores with localStorage. This challenge is a smaller, safer version of that same workflow.
Connection to the project: The code acts like a mock local leaderboard. It shows how I understand storing data, reading it back, sorting it, and displaying useful results to the user.
async saveScore(score) {
    const response = await fetch(`${this.apiBase}/leaderboard`, {
        method: 'POST',
        headers: { 'Content-Type': 'application/json' },
        body: JSON.stringify({
            name:    this.playerName,
            score:   score,
            levelId: this.config.levelId
        })
    });
}
Input / Output
document.addEventListener('keydown', this.boundKeyDown);

handleKeyDown(event) {
    if (event.code === 'Space') {
        this.attackRequested = true;
        event.preventDefault();
    }
}

updateHud(message = null) {
    const playerHpEl  = document.getElementById(`peppa-player-hp-${this.config.levelId}`);
    const enemyHpEl   = document.getElementById(`peppa-enemy-hp-${this.config.levelId}`);
    const messageEl   = document.getElementById(`peppa-message-${this.config.levelId}`);
}
Input comes from the keyboard. A specific example is the space bar, which triggers attacks. The game also uses WASD movement through the player sprite data configuration.
Output appears through the HUD. The game updates text for player HP, enemy HP, and messages like:
- "Laser hit! Peppa took damage."
- "You lost. Restarting level..."
- "George defeated! Score: 400. Moving to next level..."
This is important because it gives the player immediate feedback about what is happening.
Gameplay Mechanics
Projectile Motion and Hit Detection
spawnLaserStraight(fromX, fromY, direction, isPlayerLaser) {
    const [vx, vy] = this.directionToVelocity(direction);
    this.lasers.push({
        x: fromX,
        y: fromY,
        vx,
        vy,
        isPlayerLaser,
        life: 60,
        maxLife: 60
    });
}
One of the most specific gameplay systems in the code is the laser system. When the player attacks, the game creates a new laser object with x and y position, velocity, type, and lifetime. The projectile actually stores its own position and speed values and updates over time.
if (L.isPlayerLaser && boss && !boss.isDefeated) {
    if (
        hitLeft           <  boss.position.x + boss.width  &&
        hitLeft + hitW    >  boss.position.x               &&
        hitTop            <  boss.position.y + boss.height &&
        hitTop  + hitH    >  boss.position.y
    ) {
        boss.takeDamage(1);
        this.updateHud(`Laser hit! ${this.config.enemyName} took damage.`);
        this.lasers.splice(i, 1);
    }
}
This collision code checks whether a player laser overlaps the boss hitbox. If it does, the boss takes damage and the laser is removed. The updated version also uses laser sources so Player 1 lasers can be cyan, Player 2 lasers can be green, and boss lasers can be red. This makes the gameplay easier to understand visually.
DOM Manipulation
updateHud(message) {
    const hud = document.getElementById("hud");
    if (hud) {
        hud.textContent = message;
    }
}
DOM manipulation allows the game to update what the player sees on the screen outside of the canvas. While the canvas handles graphics like characters and movement, the DOM is used for UI elements like score, messages, and the leaderboard.
For example, when the player scores points or defeats an enemy:
- The game calls
updateHud() - The text inside the HUD element changes
- The player immediately sees feedback on screen
const leaderboardDiv = document.getElementById("leaderboard");

this.leaderboard.forEach(entry => {
    const item = document.createElement("div");
    item.textContent = `${entry.name}: ${entry.score}`;
    leaderboardDiv.appendChild(item);
});
After retrieving data from the API, the game dynamically creates HTML elements and adds them to the page. This makes the leaderboard update in real time without refreshing the page.
const button = document.getElementById("startButton");

button.addEventListener("click", () => {
    this.start();
});
DOM events allow the player to interact with the game using buttons or UI elements. This shows how the DOM connects user input to game logic.
Documentation and Debugging
This section explains how my Peppa Pig Fighting Game uses code documentation, JSDoc comments, console logs, DevTools, hitbox visualization, network debugging, application storage checks, and testing to make the project easier to understand and fix.
| Learning Objective | Project Evidence Required | Assessment Method |
|---|---|---|
| Code Documentation | Use comments and JSDoc to explain classes, constructors, parameters, return values, and important logic. | Review code comments, method headers, and portfolio explanations. |
| Console Debugging | Use console.log(), console.warn(), and console.error() to track game state. |
Demo console output while testing the game. |
| Hitbox Debugging | Use a visible hitbox rectangle to verify collision boundaries. | Compare visual sprite location to collision rectangle. |
| Network Debugging | Inspect API requests, status codes, and JSON payloads in the Network tab. | Review fetch calls and response handling. |
| Application Debugging | Check localStorage values for player name, game mode, selected characters, and leaderboard data. | Inspect Application tab storage values after gameplay. |
JSDoc Comments and Code Documentation
Code documentation makes the project easier to understand because it explains what each class or method does before someone reads the actual code. In my game, documentation is especially important because different systems work together, such as the boss class, laser system, player input, HUD output, localStorage, and leaderboard API.
/**
 * PeppaBossEnemy — custom boss class extending the Enemy base.
 * Adds health system, defeat state, movement AI, and hitbox debugging.
 *
 * @class PeppaBossEnemy
 * @extends Enemy
 */
class PeppaBossEnemy extends Enemy {
  /**
   * @param {Object} data - Sprite and config data for this enemy.
   * @param {number} data.health - Starting HP for this boss.
   * @param {number} data.moveSpeed - Pixels per frame toward the player.
   * @param {Object} gameEnv - Shared game environment reference.
   */
  constructor(data = null, gameEnv = null) {
    super(data, gameEnv);
    this.health = data?.health ?? 3;
    this.maxHealth = this.health;
    this.moveSpeed = data?.moveSpeed ?? 0.8;
    this.isDefeated = false;
  }
}
This documentation explains the purpose of the class and the type of data the constructor expects. The comments make the code easier to review because the reader can quickly understand that this class controls the boss enemy's health, movement, and defeated state.
Method Documentation with Parameters and Return Values
Methods that change game state should be documented because they affect gameplay directly. For example,
takeDamage(amount) changes boss health and returns whether the boss has been defeated.
/**
 * Applies damage to the boss.
 *
 * @param {number} amount - HP to subtract from the boss.
 * @returns {boolean} true if this hit defeated the boss.
 */
takeDamage(amount = 1) {
    if (this.isDefeated) return true;

    this.health = Math.max(0, this.health - amount);

    if (this.health === 0) {
        this.isDefeated = true;
        this.canvas.style.filter = 'grayscale(1) brightness(0.8)';
        this.canvas.style.opacity = '0.6';
    }

    return this.isDefeated;
}
The @param tag explains what the method receives, and the @returns tag explains what the method sends back.
In this case, the return value matters because the level logic can use it to decide whether the battle should end.
Debugging with DevTools
Debugging was important because the game has several systems running at the same time. Player movement, boss movement, lasers, collisions, score saving, localStorage, and API requests all have to work together. I used browser DevTools to inspect the game's behavior and find problems faster.
| DevTools Area | What I Used It For |
|---|---|
| Console | Tracked HP changes, laser spawns, boss defeats, score saving, and API errors while the game was running. |
| Sources | Used breakpoints to pause inside important methods like takeDamage() and inspect variables line by line. |
| Network | Checked leaderboard or API fetch() requests, request bodies, response codes, and JSON response data. |
| Application | Checked localStorage keys like peppaGameMode, player names, character choices, and local leaderboard values. |
| Elements | Inspected HUD divs, canvas layers, button elements, and styling to make sure UI output was placed correctly. |
Console Logging Pattern
Console logs helped me check what was happening without stopping the game. I used logs for boss spawning, laser hits, HP changes, defeated state, hitbox positions, leaderboard saving, and API errors.
// Strategic console.log placement — tracks state during gameplay
console.log(`[PeppaBossEnemy] Spawned: ${data?.id} with ${this.health} HP`);
console.log(`[Boss] Hit! HP: ${this.health}/${this.maxHealth}`);
console.log(`[Boss] Defeated!`);
console.warn(`[Boss] Invulnerable, ignoring damage.`);
console.log(`[Hitbox] pos=(${Math.round(this.position.x)},${Math.round(this.position.y)})`);
console.log(`[Leaderboard] Score saved:`, data);
console.error(`[Leaderboard] POST failed:`, error.message);
These logs make debugging easier because I can see when a method runs and whether the important variables have the values I expect.
Hitbox Debugging
Hitbox debugging helped me compare what the player sees to what the collision system actually checks. Sometimes a sprite image can be larger than the visible character, so a laser might look like it missed while the rectangular hitbox still counts it as a hit. Drawing the hitbox makes that problem easier to fix.
/**
 * Draws a red rectangle over the boss sprite for collision debugging.
 */
drawHitbox() {
    const ctx = this.gameEnv?.ctx;
    if (!ctx) return;

    ctx.save();
    ctx.strokeStyle = 'rgba(255, 0, 0, 0.85)';
    ctx.lineWidth = 2;
    ctx.strokeRect(this.position.x, this.position.y, this.width, this.height);
    ctx.fillStyle = 'rgba(255, 0, 0, 0.08)';
    ctx.fillRect(this.position.x, this.position.y, this.width, this.height);
    ctx.restore();
}
Why this matters: If the visible character and the collision rectangle do not match, the game feels unfair. Hitbox debugging helps make collision detection match what the player sees on screen.
Network and API Debugging
Network debugging is important because API calls can fail for reasons that are not visible on the page. The backend might be offline, the request body might be wrong, the server might return an error status, or CORS could block the request. The Network tab helps check the real request and response.
// API error handling pattern
try {
    const response = await fetch(url, fetchOptions);

    if (!response.ok) {
        throw new Error(`HTTP ${response.status}`);
    }

    const data = await response.json();
    return data;
} catch (error) {
    console.error(`[API] Request failed: ${error.message}`);
    return null;
}
This pattern prevents the game from crashing when an API request fails. Instead of breaking gameplay, the project logs the issue and continues running.
Testing and Verification
I tested the game by playing through important features and checking whether the screen output and saved data matched the expected behavior. These tests helped verify that the game systems worked during a live demo.
- Tested whether pressing
Spacecreates Player 1 lasers. - Tested whether Player 2 can attack with
Enterin two-player mode. - Tested whether laser collision reduces boss health.
- Tested whether enemy lasers and boss collisions reduce player health.
- Tested whether the battle ends when health reaches
0. - Tested whether the HUD updates health, messages, score, and leaderboard output.
- Tested whether localStorage keeps player name, game mode, and selected characters after reload.
- Tested whether API failures are caught with
try/catchinstead of crashing the game.
Testing connection: These tests connect to the project because each one checks a real gameplay system, such as input, collisions, storage, API calls, and DOM output.
Additional Projects & CS111 Connections
Along with my Peppa Pig Fighting Game, I also built other projects that apply the same CS111 concepts in different ways. These include a calculator and a word game, which demonstrate how programming ideas like input, output, conditionals, strings, and DOM manipulation can be used across multiple applications.
▶ Calculator Project | ▶ Word Game Project
🧮 Calculator — Operators, Input, and Real-Time Output
The calculator project focuses on handling user input and performing mathematical operations. Each button represents an input event, and the program updates the display dynamically based on what the user presses.
- Clicking numbers builds an expression
- Operators like
+,-,*, and÷perform calculations =evaluates the expressionA/Cclears the screen√adds an extra math feature beyond the four basic operations
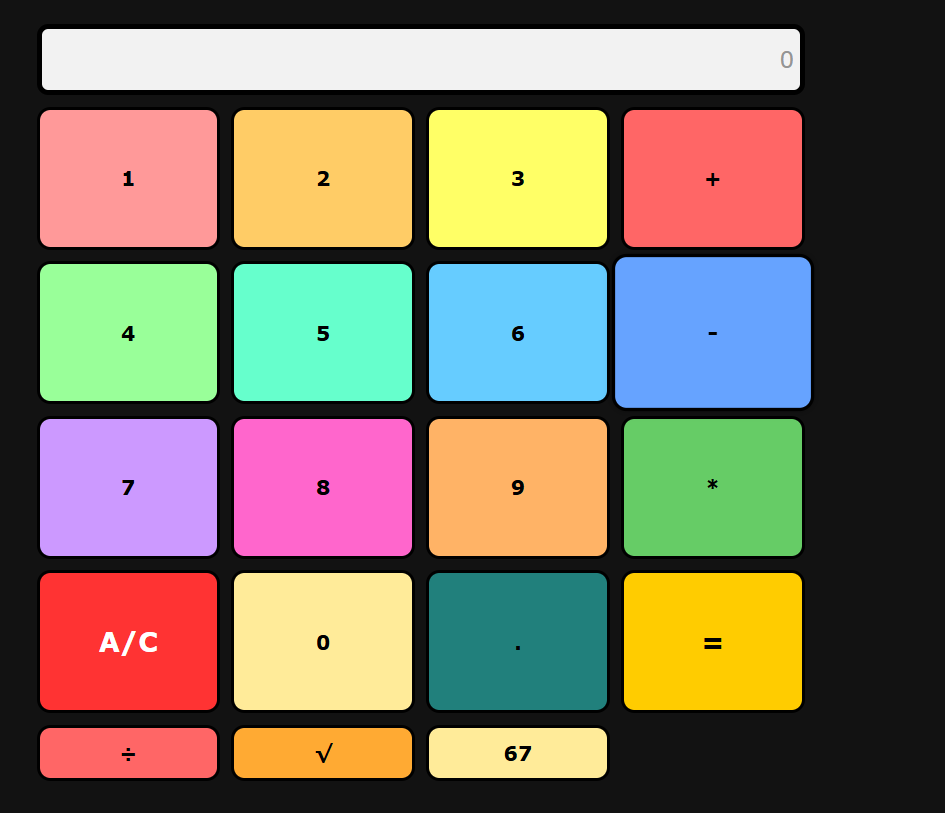
This project strengthens concepts like variables, operators, functions, conditionals, and DOM manipulation. It also shows how event-driven programming works in a web interface.
⌨️ Word Game — Strings, Accuracy, and Dynamic Feedback
The word game focuses on string handling and real-time feedback. The user types words or phrases, and the program compares their input to the expected text while calculating speed and accuracy.
- Stores prompt text as a string
- Reads user input continuously
- Calculates WPM (words per minute)
- Tracks accuracy based on correct characters
- Updates results live while the player is typing
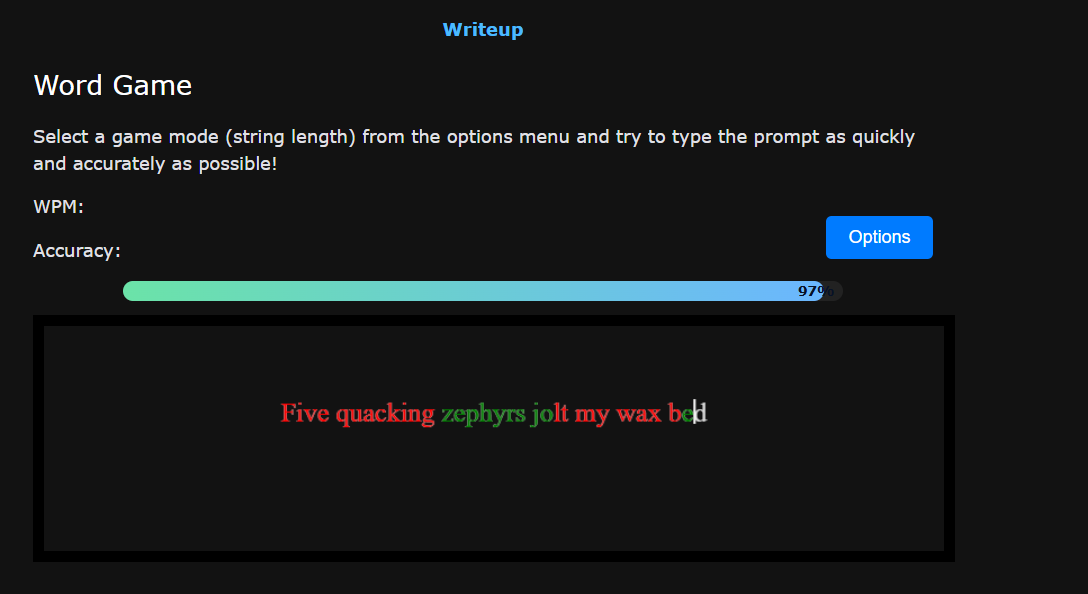
Together, these projects show that I applied CS111 concepts across multiple types of programs, not just one game. This demonstrates a deeper understanding of programming concepts and how they can be reused in different contexts.
Homework Connections
These assignments connect directly to the concepts used in my game project. Each one helped build the skills needed for features like player movement, health systems, class design, conditionals, arrays of lasers, coins, localStorage, and API integration.
Relates to storing values like player health, score, cooldown timers, coin count, player names, and positions.
Connects to game-state flags like battleEnded, isPlayerLaser, attackRequested, and whether the game is in single-player or two-player mode.
Supports the class-based structure of the game, where the level, player, enemy, coins, lasers, and leaderboard data are managed through objects and class properties.
Connects to methods like initialize(), updateHud(), generateCoins(), spawnLaser(), saveScore(), and loadLeaderboard().
Relates to win and lose conditions, cooldown checks, collision checks, player mode checks, and API/localStorage error handling.
Connects to object-oriented programming in the project, especially the reusable PeppaBattleLevelBase class and its gameplay methods.
Relates to arrays like this.lasers, this.classes, this.coins, and this.leaderboard.